
Bill Young has created a new wood joint that takes advantage of machining capabilities of Personal Robotic Tools. Bill calls these joints finger-lockin and he's put them to use in a wonderful knock-together ShopBot Sawhorse. There is a spring lock in the joint that allows you to snap the parts together. After the pieces is assembled, you tap wedges into the joints to firmly lock them. The wedges are also cut from the plywood sheet as part of the cutting file. There is a slot left open at the end of the wedge so that you can use a screwdriver to pop the wedges out if you want to take the piece apart.
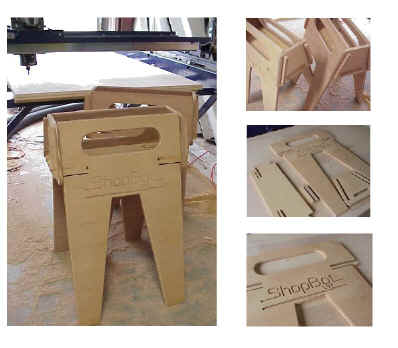 The ShopBot Sawhorse
Project contains instructions and Parts Files for creating two of
them from a sheet of 3/4" plywood. These sawhorses are incredibly sturdy
but will conveniently stack for storage. If you want to disassemble
them for flat storage, there is a slot to quickly pop the locking
wedges out with a screw driver. They also have a tool box area and
handles for easily moving them around. We think you'll find them useful
and also appreciate the way they illustrate how CNC techniques can
be put to use in everyday projects. These parts could not be
cut by hand, but the precision of robotics cutting allows locking
joints, with quick assembly, and the sturdiness of a tight fitting
design. We expect you'll probably add new twists to this sawhorse
design and hope you'll use this project as an inspiration for your
own robotic tool creativity.
The ShopBot Sawhorse
Project contains instructions and Parts Files for creating two of
them from a sheet of 3/4" plywood. These sawhorses are incredibly sturdy
but will conveniently stack for storage. If you want to disassemble
them for flat storage, there is a slot to quickly pop the locking
wedges out with a screw driver. They also have a tool box area and
handles for easily moving them around. We think you'll find them useful
and also appreciate the way they illustrate how CNC techniques can
be put to use in everyday projects. These parts could not be
cut by hand, but the precision of robotics cutting allows locking
joints, with quick assembly, and the sturdiness of a tight fitting
design. We expect you'll probably add new twists to this sawhorse
design and hope you'll use this project as an inspiration for your
own robotic tool creativity.
Bill's projects make use of a "main" Part File that calls up all the component Part Files. The main file for this project is called "sbhorse.sbp". Take a look and you will see how the various secondary files in the project are called up for cutting. There are also abbreviated instructions at the beginning of this main file.
The project is cut from a full piece of 3/4" plywood. A reasonably flat piece of inexpensive cabinet plywood is probably a good choice for the project. Cut using a 1/4" router bit (a carbide spiral up-cut will work well). Bill (in boat-builder fashion) zeros from the surface of the table (not the surface of the material). X and Y axis zeros are set at the bottom left of the table with the bit centered on the exact corner of the 4 X 8 sheet (Note: Take this seriously because every inch of the sheet is used).
If you have a vacuum hold-down table that will pull your plywood flat, put your plywood in place and run the main file "sbhorse.sbp". If you do not have a vacuum hold-down, Bill has provided a drilling file that will make marks where screws should go to hold the plywood in place during cutting. With your 1/4" bit in the router, put your plywood in place on the tool and hold it with a couple of clamps at the edges. Then run the file "scruholz.sbp" which will position the router and drill a number of starter holes for screws that are safely positioned to hold the plywood sheet in place (drywall screws work well).
As with most ShopBot Projects, this one will make more sense to you if you first run it in Preview Mode before you start to cut to see how it all works and as always, doing a partial air-cut to see how the file is going to run is probably a good idea too .
This Project file and its design are Copyright property of Bill Young and ShopBot Tools, Inc. They are made available to you here for your private use. To use or sell these projects or any components of them commercially, a license must be obtained from ShopBot Tools. Licenses are available for a reasonable fee.